728x90
[자바에서 파일 업로드하는 방법]
- 파일은 request객체로 수신이 안되기 때문에 파일을 업로드하는 경우에는 이를 처리해줄 객체를 사용해야 하는데 이 객체를 사용하기 위한 라이브러리를 추가해야 한다. 절차를 아래와 같다.
- 다음의 사이트로 접속한다.
- 왼쪽 메뉴에서 COS File Upload Library를 선택한다.
- 밑으로 내려서 cos-22.05.zip파일을 다운로드한다.
- 압축을 해제하고 lib폴더 내에 있는 cos.jar파일을 프로젝트의 WEB-INF하위의 lib폴더로 복사한다.
[File Upload용 Form을 작성 시 반드시 준수해야 할 사항]
- method="POST"
- enctype="multipart/form-data"
[input_file.jsp]
|
1
2
3
4
5
6
7
8
9
10
11
12
13
14
15
16
17
18
19
20
21
22
23
24
25
26
27
28
29
30
31
32
33
34
35
36
37
38
39
40
41
42
43
44
45
46
|
<!DOCTYPE html>
<html>
<head>
<meta charset="UTF-8">
<title>Insert title here</title>
<script type="text/javascript">
function send(f){
var title = f.title.value.trim();
var photo = f.photo.value;
if(title==''){
alert('제목을 입력하세요.');
f.title.value='';
f.title.focus();
return;
}
if(photo==''){
alert('업로드할 사진을 선택하세요.');
return;
}
f.action="upload.do";
f.submit();
}
</script>
</head>
<body>
<!-- file upload 용 form 준수사항
1. method="POST"
2. enctype="multipart/form-data"
-->
<form action="" method="POST" enctype="multipart/form-data">
제목: <input type="text" name="title"><br>
사진: <input type="file" name="photo"><br>
<input type="button" value="전송" onclick="send(this.form);">
</form>
</body>
</html>
|
cs |
[ FileUploacAction ]
파일 업로드 처리 객체에서 사용하는 인자 정보는 아래 소스코드의 주석을 참고하길 바란다.
- 파일을 저장하는 경로를 프로젝트의 web context와 관계없는 곳에 저장하면 그저 upload만 하고 끝이기 때문에, 프로젝트 내에서 사용하기 위해서는 web context와 관계있는 위치에 저장해야 한다. 자바 파일을 제외한 html, jsp, image파일 등은 webapp에 저장하기 때문에 앞으로는 이 경로를 파일 저장 경로로 설정하여 upload 한 파일을 사용할 것이다.
- 이때 파일의 저장 경로는 상대 경로가 아닌 절대 경로를 요구하는 데, 웹 경로로 절대 경로를 구해주는 방법을 가지고 있는 ServletContext라는 프로그램 전역을 관리하는 객체를 사용해야 한다.
- WebContext(편집 경로) 안에 있는 모든 파일은 URL 주소 즉, 웹 경로를 사용한다. 하지만 파일을 저장할 때는 반드시 웹 애플리케이션이 실제로 저장되는 절대 경로를 사용해야 한다. 실행 파일의 위치과 편집 파일의 위치와 구조가 다름
- form에 있는 데이터를 받을 때, 파일 업로드 정보만을 넘기는 것이 아니라, 다른 String파라미터도 전송하게 되는데, 이 인자들을 기존처럼 request로 수신하게 되면 정확하게 수신되지 않아 null이 된다. 이 이유는 mr을 생성함과 동시에 내장객체인 request가 가지고 있는 요청 정보와 이를 처리할 수 있는 권한을 mr에 위임했기 때문에 request는 읽어 들일 수 없다. 따라서 mr객체를 사용해서 파라미터를 읽어야 한다. 단, 사용자 ip를 구하는 getRemoteAddr() 메서드가 mr객체에게는 없기 때문에 request를 사용해서 읽는다.
- 파일을 업로드가 성공적으로 수행되더라도 이클립스에서 생성한 폴더에는 나오지 않을 수가 있다. 이는 이클립스의 project explorer에는 실제 저장된 경로가 아니라 편집상의 경로가 나타나기 때문이다.
- 업로드한 파일명을 읽는 방법은 아래 코드를 참고하길 바란다.
|
1
2
3
4
5
6
7
8
9
10
11
12
13
14
15
16
17
18
19
20
21
22
23
24
25
26
27
28
29
30
31
32
33
34
35
36
37
38
39
40
41
42
43
44
45
46
47
48
49
50
51
52
53
54
55
56
57
58
59
60
61
62
63
64
65
66
67
68
69
70
71
72
73
74
75
76
77
78
79
80
81
82
83
84
85
86
87
|
package action;
import java.io.File;
import java.io.IOException;
import javax.servlet.RequestDispatcher;
import javax.servlet.ServletContext;
import javax.servlet.ServletException;
import javax.servlet.annotation.WebServlet;
import javax.servlet.http.HttpServlet;
import javax.servlet.http.HttpServletRequest;
import javax.servlet.http.HttpServletResponse;
import com.oreilly.servlet.MultipartRequest;
import com.oreilly.servlet.multipart.DefaultFileRenamePolicy;
/**
* Servlet implementation class FileUploadAction
*/
@WebServlet("/upload.do")
public class FileUploadAction extends HttpServlet {
private static final long serialVersionUID = 1L;
/**
* @see HttpServlet#service(HttpServletRequest request, HttpServletResponse response)
*/
protected void service(HttpServletRequest request, HttpServletResponse response)
throws ServletException, IOException {
// TODO Auto-generated method stub
//1. 저장 위치
//String path = "C:\\Work\\upload";//절대 경로 요구
String web_path = "/upload/";//웹 경로
//1-1. 현재 웹 컨텍스트(프로그램) 전역을 관리하는 객체
ServletContext application = request.getServletContext();
//ServletContext -> 프로젝트의 전역을 관리하는 전역 객체 -> 웹 경로를 이용해서 절대 경로를 구하는 방법을 알고 있는 객체임
String path = application.getRealPath(web_path);
System.out.println(path);
//2. 최대 업로드 크기
int max_size = 1024*1024*100; //100MB 이 값을 초과하는 순간 에러 발생
//3. 파일 업로드 처리 객체(MultipartRequest)가 처리해야 된다.
// 객체위임 파일경로 최대 파일크기 인코딩 파일명 겹칠시 처리방법
MultipartRequest mr = new MultipartRequest(request, //내장 객체에게 수신정보처리를 위임받는다.
path, //파일 저장 경로(절대 경로를 요구한다.)
max_size, //업로드 최대 크기
"utf-8", //수신 인코딩
new DefaultFileRenamePolicy()); //동일한 파일명이 업로드 된 경우 -> 동일한 파일명에서 마지막에 숫자만 +1씩 증가시키면서 저장한다.
//4. 업로드된 파일명 구하기
String filename = "no_file";
File f = mr.getFile("photo");
if(f != null) {
//업로드된 파일이 있으면...
filename = f.getName();
}
//5. 타이틀(parameter)받기 -> mr로 수신하기
//위에서 request의 정보와 처리 권한을 위임했기 때문에
//기존의 내장객체로 파라미터로 받으면 null값이 들어오면서 정확한 파라미터를 받을 수 없다.
String title = mr.getParameter("title");
System.out.println(title);
//6. 상대방 ip정보는 request로 받아야 한다.
String ip = request.getRemoteAddr();
System.out.println(ip);
//7. request binding
request.setAttribute("title", title);
request.setAttribute("filename", filename);
//forward
String forward_page = "result_upload.jsp";
RequestDispatcher disp = request.getRequestDispatcher(forward_page);
disp.forward(request, response);
}
}
|
cs |
[ 출력 ] result_upload.jsp
|
1
2
3
4
5
6
7
8
9
10
11
12
13
14
15
16
17
18
19
|
<%@ page language="java" contentType="text/html; charset=UTF-8"
pageEncoding="UTF-8"%>
<!DOCTYPE html>
<html>
<head>
<meta charset="UTF-8">
<title>Insert title here</title>
</head>
<body>
<hr>
업로드 결과....
<hr>
제목: ${requestScope.title }<br>
<img src="upload/${filename }" width="120"><br>
<a href="input_file.html">다시하기</a>
</body>
</html>
|
cs |
[ 2개 이상의 파일을 업로드 하는 방법. ]
JSP에서는 form에서 건네주는 파일의 name값을 다르게 해서 주지만, 후에 Spring을 사용할 때는 데이터를 배열로 묶어서 한 번에 처리하기 때문에 name을 같은 이름으로 사용한다고 하니 유의하자.
[ input_file2.jsp ]
더보기
|
1
2
3
4
5
6
7
8
9
10
11
12
13
14
15
16
17
18
19
20
21
22
23
24
25
26
27
28
29
30
31
32
33
34
35
36
37
38
39
40
41
42
43
44
45
46
47
48
49
50
51
52
53
|
<!DOCTYPE html>
<html>
<head>
<meta charset="UTF-8">
<title>Insert title here</title>
<script type="text/javascript">
function send(f){
var title = f.title.value.trim();
var photo1 = f.photo1.value;
var photo2 = f.photo2.value;
if(title==''){
alert('제목을 입력하세요.');
f.title.value='';
f.title.focus();
return;
}
if(photo1==''){
alert('업로드할 사진1을 선택하세요.');
return;
}
if(photo2==''){
alert('업로드할 사진2을 선택하세요.');
return;
}
f.action="upload2.do"; //FileUpload2Action
f.submit();
}
</script>
</head>
<body>
<!-- file upload 용 form 준수사항
1. method="POST"
2. enctype="multipart/form-data"
-->
<form action="" method="POST" enctype="multipart/form-data">
제목 : <input name="title"><br>
사진1: <input type="file" name="photo1"><br>
사진2: <input type="file" name="photo2"><br>
<input type="button" value="전송" onclick="send(this.form);">
</form>
</body>
</html>
|
cs |
[FileUpload2Action]
더보기
|
1
2
3
4
5
6
7
8
9
10
11
12
13
14
15
16
17
18
19
20
21
22
23
24
25
26
27
28
29
30
31
32
33
34
35
36
37
38
39
40
41
42
43
44
45
46
47
48
49
50
51
52
53
54
55
56
57
58
59
60
61
62
63
64
65
66
67
68
69
70
71
72
73
74
75
76
77
78
79
80
81
82
83
84
85
86
87
88
89
90
91
92
93
94
95
|
package action;
import java.io.File;
import java.io.IOException;
import javax.servlet.RequestDispatcher;
import javax.servlet.ServletContext;
import javax.servlet.ServletException;
import javax.servlet.annotation.WebServlet;
import javax.servlet.http.HttpServlet;
import javax.servlet.http.HttpServletRequest;
import javax.servlet.http.HttpServletResponse;
import com.oreilly.servlet.MultipartRequest;
import com.oreilly.servlet.multipart.DefaultFileRenamePolicy;
/**
* Servlet implementation class FileUploadAction
*/
@WebServlet("/upload2.do")
public class FileUpload2Action extends HttpServlet {
private static final long serialVersionUID = 1L;
/**
* @see HttpServlet#service(HttpServletRequest request, HttpServletResponse response)
*/
protected void service(HttpServletRequest request, HttpServletResponse response)
throws ServletException, IOException {
// TODO Auto-generated method stub
//1. 저장 위치
//String path = "C:\\Work\\upload";//절대 경로 요구
String web_path = "/upload/";//웹 경로
//1-1. 현재 웹 컨텍스트(프로그램) 전역을 관리하는 객체
ServletContext application = request.getServletContext();
//ServletContext -> 프로젝트의 전역을 관리하는 전역 객체 -> 웹 경로를 이용해서 절대 경로를 구하는 방법을 알고 있는 객체임
String path = application.getRealPath(web_path);
System.out.println(path);
//2. 최대 업로드 크기
int max_size = 1024*1024*100; //100MB 이 값을 초과하는 순간 에러 발생
//3. 파일 업로드 처리 객체(MultipartRequest)가 처리해야 된다.
// 객체위임 파일경로 최대 파일크기 인코딩 파일명 겹칠시 처리방법
MultipartRequest mr = new MultipartRequest(request, //내장 객체에게 수신정보처리를 위임받는다.
path, //파일 저장 경로(절대 경로를 요구한다.)
max_size, //업로드 최대 크기
"utf-8", //수신 인코딩
new DefaultFileRenamePolicy()); //동일한 파일명이 업로드 된 경우 -> 동일한 파일명에서 마지막에 숫자만 +1씩 증가시키면서 저장한다.
//4. 업로드된 파일명 구하기
String filename1 = "no_file";
String filename2 = "no_file";
File f1 = mr.getFile("photo1");
File f2 = mr.getFile("photo2");
if(f1 != null) {
//업로드된 파일이 있으면...
filename1 = f1.getName();
}
if(f2 != null) {
//업로드된 파일이 있으면...
filename2 = f2.getName();
}
//5. 타이틀(parameter)받기 -> mr로 수신하기
//위에서 request의 정보와 처리 권한을 위임했기 때문에
//기존의 내장객체로 파라미터로 받으면 null값이 들어오면서 정확한 파라미터를 받을 수 없다.
String title = mr.getParameter("title");
System.out.println(title);
//6. 상대방 ip정보는 request로 받아야 한다.
String ip = request.getRemoteAddr();
System.out.println(ip);
//7. request binding
request.setAttribute("title", title);
request.setAttribute("filename1", filename1);
request.setAttribute("filename2", filename2);
//forward
String forward_page = "result_upload2.jsp";
RequestDispatcher disp = request.getRequestDispatcher(forward_page);
disp.forward(request, response);
}
}
|
cs |
[result_upload2.jsp]
더보기
|
1
2
3
4
5
6
7
8
9
10
11
12
13
14
15
16
17
18
19
20
|
<%@ page language="java" contentType="text/html; charset=UTF-8"
pageEncoding="UTF-8"%>
<!DOCTYPE html>
<html>
<head>
<meta charset="UTF-8">
<title>Insert title here</title>
</head>
<body>
<hr>
업로드 결과....
<hr>
제목: ${requestScope.title }<br>
<img style="border: 1px solid black;" src="upload/${filename1 }" width="400">
<img style="margin-left: 20px; border: 1px solid black" src="upload/${filename2 }" width="400"> <br>
<a href="input_file2.html">다시하기</a>
</body>
</html>
|
cs |
[ 파일 업로드 기능이 있는 포토 갤러리 만들기 ]
[ DB 설계 ]
지난 번에 사용한 memember 테이블과 연동해서 사용하도록 하겠다. 회원관리 실습 및 memmber테이블은 여기에서 확인하기 바란다.
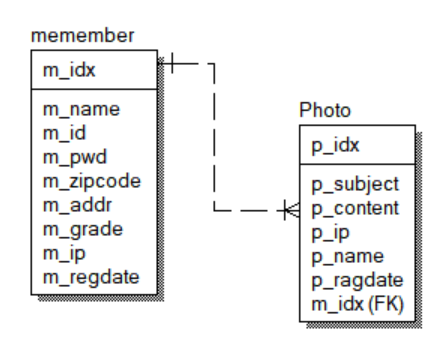
[ Photo Table]
|
1
2
3
4
5
6
7
8
9
10
11
12
13
14
15
16
17
18
19
20
21
22
23
|
--일련번호 관리 객체 시퀀스 생성
create sequence seq_photo_p_idx
--테이블 생성
create table photo
(
p_idx int, --일련번호
p_subjet varchar2(1000) not null, --사진제목
p_content varchar2(1000) not null, --사진설명
p_filename varchar2(1000) not null, --파일명
p_ip varchar2(100) not null, --아이피
p_regdate date, --등록일자
m_idx int --등록사용자 m_idx
)
--기본키
alter table photo
add constraint pk_photo_p_idx primary key(p_idx);
--참조키
alter table photo
add constraint fk_photo_m_idx foreign key(m_idx) references memember(m_idx)
|
cs |
[ PhotoVo ]
|
1
2
3
4
5
6
7
8
9
10
11
12
13
14
15
16
17
18
19
20
21
22
23
24
25
26
27
28
29
30
31
32
33
34
35
36
37
38
39
40
41
42
43
44
45
46
47
48
49
50
51
52
53
54
55
56
57
58
59
60
61
62
63
64
65
66
67
68
69
70
71
72
73
74
75
76
77
78
79
80
81
82
83
84
85
86
87
88
|
package vo;
public class PhotoVo {
int p_idx;
String p_subject;
String p_content;
String p_filename;
String p_ip;
String p_regdate;
int m_idx;
public PhotoVo() {
super();
}
//등록시 사용할 생성자
public PhotoVo(String p_subject, String p_content, String p_filename, String p_ip, int m_idx) {
super();
this.p_subject = p_subject;
this.p_content = p_content;
this.p_filename = p_filename;
this.p_ip = p_ip;
this.m_idx = m_idx;
}
public int getP_idx() {
return p_idx;
}
public void setP_idx(int p_idx) {
this.p_idx = p_idx;
}
public String getP_subject() {
return p_subject;
}
public void setP_subject(String p_subject) {
this.p_subject = p_subject;
}
public String getP_content() {
return p_content;
}
public void setP_content(String p_content) {
this.p_content = p_content;
}
public String getP_filename() {
return p_filename;
}
public void setP_filename(String p_filename) {
this.p_filename = p_filename;
}
public String getP_ip() {
return p_ip;
}
public void setP_ip(String p_ip) {
this.p_ip = p_ip;
}
public String getP_regdate() {
return p_regdate;
}
public void setP_regdate(String p_regdate) {
this.p_regdate = p_regdate;
}
public int getM_idx() {
return m_idx;
}
public void setM_idx(int m_idx) {
this.m_idx = m_idx;
}
}
|
cs |
[ PhotoDao ]
더보기
|
1
2
3
4
5
6
7
8
9
10
11
12
13
14
15
16
17
18
19
20
21
22
23
24
25
26
27
28
29
30
31
32
33
34
35
36
37
38
39
40
41
42
43
44
45
46
47
48
49
50
51
52
53
54
55
56
57
58
59
60
61
62
63
64
65
66
67
68
69
70
71
72
73
74
75
76
77
78
79
80
81
82
83
84
85
86
87
88
89
90
91
92
93
94
95
96
97
98
99
100
101
102
103
104
105
106
107
108
109
110
111
112
113
114
115
116
117
118
119
120
121
122
123
124
125
126
127
128
129
130
131
132
133
134
135
136
137
138
139
140
141
142
143
144
145
146
147
148
149
150
151
152
153
154
155
156
157
158
|
package dao;
import java.sql.Connection;
import java.sql.PreparedStatement;
import java.sql.ResultSet;
import java.sql.SQLException;
import java.util.ArrayList;
import java.util.List;
import service.DBService;
import vo.PhotoVo;
public class PhotoDao {
//single-ton : 객체 1개만 생성해서 사용하자
static PhotoDao single = null;
public static PhotoDao getInstance() {
//객체가 생성되어 있지 않으면 만들어라.
if (single == null) {
single = new PhotoDao();
}
//이전에 만들어 놨던 객체를 그대로 반환한다.
return single;
}
//외부에서 생성하지 못하도록 접근제한. 객체는 getInstance메소드를 통해서만 생성가능.
private PhotoDao() {
// TODO Auto-generated constructor stub
}
//p_idx에 해당되는 객체 1건 조회하기
//idx에 해당되는 객체 1건 조회
public PhotoVo selectOne(int p_idx) {
PhotoVo vo = null;
Connection conn = null;
PreparedStatement pstmt = null;
ResultSet rs = null;
String sql = "select * from photo where p_idx = ?";
try {
//1. connection 얻어오기
conn = DBService.getInstance().getConnection();
//2. PreparedStatement 얻어오기
pstmt = conn.prepareStatement(sql);
//3. pstmt setting
pstmt.setInt(1, p_idx);
//3. ResultSet 얻어오기
rs = pstmt.executeQuery();
//4. 포장
if (rs.next()) {
//rs가 가리키는 행(레코드)의 값을 읽어 온다.
//Vo로 포장(반복을 1회 돌아서 새로운 데이터를 읽을 때마다 이 레코드를 저장할 vo를 만들어서 포장해햐 한다.)
vo = new PhotoVo();
vo.setP_idx(rs.getInt("p_idx"));
vo.setP_subject(rs.getString("p_subject"));
vo.setP_content(rs.getString("p_content"));
vo.setP_filename(rs.getString("p_filename"));
vo.setP_ip(rs.getString("p_ip"));
vo.setP_regdate(rs.getString("p_regdate"));
vo.setM_idx(rs.getInt("m_idx"));
}
} catch (Exception e) {
// TODO: handle exception
e.printStackTrace();//
} finally {//반드시 실행하는 구문
try {
//연결되어 있는 상태면 끊어라.(생성 역순으로)
if (rs != null)
rs.close(); //3
if (pstmt != null)
pstmt.close();//2
if (conn != null)
conn.close();//1
} catch (SQLException e) {
// TODO Auto-generated catch block
e.printStackTrace();
}
}
return vo;
}
//전체 조회
public List<PhotoVo> selectList() {
List<PhotoVo> list = new ArrayList<PhotoVo>();
Connection conn = null;
PreparedStatement pstmt = null;
ResultSet rs = null;
String sql = "select * from photo order by p_idx desc";
try {
//1. connection 얻어오기
conn = DBService.getInstance().getConnection();
//2. PreparedStatement 얻어오기
pstmt = conn.prepareStatement(sql);
//3. ResultSet 얻어오기
rs = pstmt.executeQuery();
//4. 포장
while (rs.next()) {
//rs가 가리키는 행(레코드)의 값을 읽어 온다.
//Vo로 포장(반복을 1회 돌아서 새로운 데이터를 읽을 때마다 이 레코드를 저장할 vo를 만들어서 포장해햐 한다.)
PhotoVo vo = new PhotoVo();
vo.setP_idx(rs.getInt("p_idx"));
vo.setP_subject(rs.getString("p_subject"));
vo.setP_content(rs.getString("p_content"));
vo.setP_filename(rs.getString("p_filename"));
vo.setP_ip(rs.getString("p_ip"));
vo.setP_regdate(rs.getString("p_regdate"));
vo.setM_idx(rs.getInt("m_idx"));
//list에 추가
list.add(vo);
}
} catch (Exception e) {
// TODO: handle exception
e.printStackTrace();//
} finally {//반드시 실행하는 구문
try {
//연결되어 있는 상태면 끊어라.(생성 역순으로)
if (rs != null)
rs.close(); //3
if (pstmt != null)
pstmt.close();//2
if (conn != null)
conn.close();//1
} catch (SQLException e) {
// TODO Auto-generated catch block
e.printStackTrace();
}
}
return list;
}
}
|
cs |
[ PhotoListAction ]
|
1
2
3
4
5
6
7
8
9
10
11
12
13
14
15
16
17
18
19
20
21
22
23
24
25
26
27
28
29
30
31
32
33
34
35
36
37
38
39
40
41
42
43
|
package action.photo;
import java.io.IOException;
import java.util.List;
import javax.servlet.RequestDispatcher;
import javax.servlet.ServletException;
import javax.servlet.annotation.WebServlet;
import javax.servlet.http.HttpServlet;
import javax.servlet.http.HttpServletRequest;
import javax.servlet.http.HttpServletResponse;
import dao.PhotoDao;
import vo.PhotoVo;
/**
* Servlet implementation class PhotoListAction
*/
@WebServlet("/photo/list.do")
public class PhotoListAction extends HttpServlet {
private static final long serialVersionUID = 1L;
/**
* @see HttpServlet#service(HttpServletRequest request, HttpServletResponse response)
*/
protected void service(HttpServletRequest request, HttpServletResponse response)
throws ServletException, IOException {
// TODO Auto-generated method stub
//전체목록 가져오기
List<PhotoVo> list = PhotoDao.getInstance().selectList();
//request binding
request.setAttribute("list", list);
//forward
String forward_page = "photo_list.jsp";
RequestDispatcher disp = request.getRequestDispatcher(forward_page);
disp.forward(request, response);
}
}
|
cs |
[ photo_list.jsp ]
지난 시간에 만들어 둔 회원관리 프로그램과 연동하여 로그인 한 경우와, 로그인 하지 않은 경우를 세션을 응용하여 구분할 것이다.
|
1
2
3
4
5
6
7
8
9
10
11
12
13
14
15
16
17
18
19
20
21
22
23
24
25
26
27
28
29
30
31
32
33
34
35
36
37
38
39
40
41
42
43
44
45
46
47
48
49
50
51
52
53
54
55
56
57
58
59
60
61
62
63
64
65
66
67
68
69
70
71
72
73
74
75
76
77
78
79
80
81
82
83
84
85
86
87
88
89
90
91
92
93
94
95
96
97
98
99
100
101
102
103
104
105
106
107
108
109
|
<%@ page language="java" contentType="text/html; charset=UTF-8"
pageEncoding="UTF-8"%>
<%@ taglib prefix="c" uri="http://java.sun.com/jsp/jstl/core" %>
<%@ taglib prefix="fn" uri="http://java.sun.com/jsp/jstl/functions" %>
<!DOCTYPE html>
<html>
<head>
<meta charset="UTF-8">
<title>Insert title here</title>
<style type="text/css">
#box{
width: 800px;
margin: auto;
margin-top: 30px;
}
#title{
text-align: center;
color: green;
font-weight: bold;
text-shadow: 1px 1px 2px black;
}
#empty_msg{
text-align: center;
color: red;
margin-top: 300px;
}
#photo_box{
width: 100%;
height: 479px;
border: 2px solid blue;
overflow-y: scroll;
}
.photo{
border: 1px solid #ccccff;
width: 120px;
height: 160px;
margin: 25px;
padding: 10px;
float: left;
}
.photo:hover{
border: 1px solid red;
}
.photo > img{
width: 120px;
height: 100px;
border: 1px solid gray;
outline: 1px solid black;
}
</style>
</head>
<body>
<div id="box">
<h1 id="title">::::PhotoGallery</h1>
<div style="text-align: right;">
<!-- 로그인이 안 된 경우 -->
<c:if test="${empty sessionScope.user }">
<input type="button" value="로그인" onclick="location.href='../member/login_form.do';">
</c:if>
<!-- 로그인이 된 경우 -->
<c:if test="${not empty user }">
<b>${user.name }님</b> 환영합니다.
<input type="button" value="로그아웃" onclick="location.href='../member/logout_form/do';">
</c:if>
</div>
<div>
<input type="button" value="사진올리기">
</div>
<div id="photo_box">
<!-- 데이터가 없는 경우 -->
<c:if test="${empty list }">
<!-- <div id="empty_msg">사진 정보가 없습니다.</div> -->
</c:if>
<!-- 데이터가 있는 경우 -->
<%-- <c:forEach var="vo" items="${list }"> --%>
<c:forEach begin="1" end="20">
<div class="photo">
<img src="">
<div>제목</div>
<div>날짜</div>
<div>다운로드</div>
</div>
</c:forEach>
</div>
</div>
</body>
</html>
|
cs |
두 테이블을 합쳐서 완성한 결과물은 실습을 마치고 난 후 다음 포스팅에서 필자의 깃허브 주소에 올려두도록 하겠다.
728x90
'BackEnd > WEB' 카테고리의 다른 글
| PhotoGallery[완결]_국비_DAY69 (0) | 2022.06.09 |
|---|---|
| 세션 트래킹_국비_Day68 (0) | 2022.06.08 |
| 백준[자바]_2206_벽부수고이동하기_BFS_너비우선탐색 (0) | 2022.06.07 |
| 세션트래킹_국비_DAY66 (0) | 2022.06.03 |
| AJAX_국비DAY65~66 (0) | 2022.06.02 |