[디지털 시계 만들기]
- 태그 사이에 값을 넣는 것은 innerHTML속성을 사용합니다.
- input태그에 값을 적는 것은 value속성을 사용합니다.
- setTimeout(함수명, 호출주기) : 1회 호출
- setInterval(함수명, 호출주기) : 지속적으로 호출
- 자바스크립트는 ms(1/1000)초 단위를 사용합니다.
[소스코드]
|
1
2
3
4
5
6
7
8
9
10
11
12
13
14
15
16
17
18
19
20
21
22
23
24
25
26
27
28
29
30
31
32
33
34
35
36
37
38
39
40
41
42
43
44
45
46
47
48
49
50
51
52
53
54
55
56
57
58
59
60
61
62
63
64
65
66
67
68
69
70
71
72
73
74
75
76
77
78
79
80
81
82
83
84
85
86
87
88
89
90
91
92
93
94
95
96
97
98
99
100
101
102
|
<%@ page language="java" contentType="text/html; charset=UTF-8"
pageEncoding="UTF-8"%>
<!DOCTYPE html>
<html>
<head>
<meta charset="UTF-8">
<title>Digital Watch</title>
<style type="text/css">
* {
margin: 0;
}
span {
display: inline-block;
width: 60px;
heigth: 60px;
background: black;
color: white;
text-align: center;
font-size: 40px;
/* border: 1px solid red; */
}
.colon{
width: 20px;
}
</style>
<script>
//윈도우 이벤트 초기화,,,
window.onload = function(){
//타이머 구동 - 호출주기(1/1000) ms단위
//setTimeout(함수명, 호출주기); //1회 호출
setTimeout(showTime,0);
//setInterval(함수명, 호출주기);//지속적 호출(clear Interval(timer)할 때 까지)
//setInterval("showTime()", 1000); 이렇게도 호출 가능
//setInterval(showTime, 1000);
setInterval(showTime, 500);
//어차피 0.5초뒤에 초를 출력하던, 1초 뒤에 초를 출력하던, 시스템 시간을 가져왔기 때문에, 초는 똑같이 1초씩 증가하고, 깜박이는 콜로만 0.5초 간격
};
var count = 0;
var toggle = true;
function showTime() {
//document.title = count++;
//시간구하기
var today = new Date();//현재 시스템 구하기
// 숫자 + '' - > 문자열
var h = today.getHours() + '';
var m = today.getMinutes() + '';
var s = today.getSeconds() + '';
//조건) 무조건 2자리로 넣을 것: 5 -> 05
if(h.length == 1) h = '0' + h;
if(m.length == 1) m = '0' + m;
if(s.length == 1) s = '0' + s;
//시 넣기
document.getElementById("hour").innerHTML = h;
//분 넣기
document.getElementById("minute").innerHTML = m;
//초 넣기
document.getElementById("second").innerHTML = s;
//class name을 이용해서 Element 정보를 얻어오기
//콜론 깜박이도록 만들기
//Toggle
toggle = !toggle;
//3항 연산자 document.getElementsByClassName("colon")[0].style.color = toggle ? "white" : "black";
document.getElementsByClassName("colon")[1].style.color = toggle ? "white" : "black";
//if-else문 /* if(toggle==true){
document.querySelectorAll(".colon")[0].style.color = "white";
document.querySelectorAll(".colon")[1].style.color = "white";
document.getElementsByClassName("colon")[0].style.color = "black";
document.getElementsByClassName("colon")[1].style.color = "black";
} else {
document.querySelectorAll(".colon")[0].style.color = "black";
document.querySelectorAll(".colon")[1].style.color = "black";
document.getElementsByClassName("colon")[0].style.color = "black";
document.getElementsByClassName("colon")[1].style.color = "black";
} */
}
</script>
</head>
<body>
<!-- 인라인태그 span -->
<span id="hour">10</span><span class="colon">:</span><span id="minute">20</span><span class="colon">:</span><span id="second">30</span>
</body>
</html>
|
cs |
[익명함수 만들기]
- 이름이 없는 일회성 함수
- 자주 사용하는 변수를 한 번만 초기화하기 위해 사용합니다.
- 변수를 생성만 해놓고, "요소가 모두 배치"되면 그때 값을 한 번만 초기화해서 사용할 수 있도록 익명함수사용하기.
- window.onload는 브라우저에 모든 요소가 배치되었을 때, 윈도우 이벤트를 초기화하는 메소드입니다.
- 요소가 배치되기 전에 위의 메소드를 호출하여 사용하면 오류가 나기 때문에 주의해야 합니다.
- 세부 내용은 아래 소스코드의 주석을 참고하겠습니다.
|
1
2
3
4
5
6
7
8
9
10
11
12
13
14
15
16
17
18
|
var su1_ctrl = null; //document.getElementById("su1");
var su2_ctrl = null; //document.getElementById("su2");
var result_ctrl = null; //document.getElementById("result");
//윈도우 초기화이벤트(모든 Element배치가 완료되면,,,)
//자바스크립트가 브라우저 전체를 관리하는 객체 window
//자바스크립트가 문서 자체를 관리하는 객체 document
//윈도우에서 모든 요소의 배치가 완료되면 init이라는 함수를 실행하겠다는 의미
//function init(){}
//window.onload = init;
//처음 한 번 호출되고 끝나는 함수
// 익명함수() : 이름없는 함수
window.onload = function(){
su1_ctrl = document.getElementById("su1");
su2_ctrl = document.getElementById("su2");
result_ctrl = document.getElementById("result");
};
|
cs |
[자바스크립트 배열]
|
1
2
3
4
5
6
7
8
9
10
11
12
13
14
15
16
17
18
19
20
21
22
23
24
25
26
27
28
29
30
|
<script type="text/javascript">
//배열 선언 0 1 2 3 4 5 6 7
var sido_array = ['서울', '경기', '인천', '대전', '대구', '부산', '광주', '목포' ]
//sido_array[99] = '제주';
//자바스크립트의 배열은 가변길이 배열이기 때문에 위와 같이 첨자를 잘못 적으면 100개짜리의 배열이 생성된다,,,
sido_array[9] = '제주';
document.write("sido_array's length=" + sido_array.length + "<br>");
for(var i=0; i<sido_array.length; i++){
document.write("sido_array[" + i + "]=" + sido_array[i] + "<br>")
}
//배열 선언 2 (가장 큰 첨자로 배열의 크기가 결정된다.)
var fruit_array = new Array();
document.write("fruit_array.length = " + fruit_array.length + "<br>");
fruit_array[0] = '참외';
fruit_array[1] = '수박';
fruit_array[2] = '딸기';
fruit_array[3] = '참외';
fruit_array[4] = '메론';
document.write("fruit_array.length = " + fruit_array.length + "<br>");
document.write("--[과일목록]--<br>");
for(var i=0; i<fruit_array.length;i++){
document.write(fruit_array[i] + " ");
}
document.write("<br>");
</script>
|
cs |
[window.onload의 의미]
jsp, html을 포함한 브라우저에서 사용되는 언어들은 스크립트 언어로 Top-Down방식 즉, 소스코드를 위에서 부터 순서대로 읽어옵니다. 기본적으로 자바스크립트를 사용한 <script>태그는 헤드영역에, 브라우저에 배치되는 element들은 바디영역에 표현이 되는데, 당연한 말이지만, 함수가 먼저 실행됩니다.
그렇다면 스크립트 영역에서 변수를 생성하여 데이터를 초기화하고, 함수를 만들어서 실행결과가 브라우저에 나오는 태그에 표현되도록 하면 어떻게 될까요? 이러한 결과는 에러로 이어집니다.
왜냐하면, 데이터를 초기화하고, 함수를 실행하는 시점에서는 바디영역의 코드를 실행하지 않았기 때문에, 브라우저에 element들이 배치되지 않은 상태입니다. 그렇기 때문에, "함수를 실행은 하겠는데, 브라우저에 배치된 태그가 아무것도 없는데 어디다 넣으라는 거냐?"라는 에러가 나타납니다.
이를 해결하기 위한 해결법은 바디영역에 소스코드가 모두 실행되고 함수가 실행되도록, 함수가 정의된 <script> 태그를 소스코드의 맨 밑에 둡니다. 또는 window.onload를 사용합니다. 이는 위에서 잠깐 언급이 되었지만, 브라우저를 관리하는 window객체에 요소들이 모두 onload되면, 즉 모두 배치되면 다음의 이어지는 명령을 실행하라는 의미입니다. 저는 익명함수를 사용해서 표현했습니다.
[JSON]
- JavaScript Object Notation
- 자바스크립트에서 사용하는 객체의 표현 방법으로 서로 다른 프로그래밍 언어, 웹 서버에서 통신하기 위한 공통적인 언어입니다. 모든 언어에서 공통적으로 사용할 수 있습니다. 데이터가 키와 값의 쌍으로 저장됩니다.
- key value
- 형식 : { '변수1' : 값1, '변수2' : 값2, ,,,,,,};
- 하나의 데이터는 데이터와 관련된 속성이 묶여있는 객체로 인식됩니다. 이런 방식으로 하는 이유는 여러 개의 데이터를 하나의 키값으로 묶고, 이러한 키들을 또 묶어서 다른 사람에게 효과적으로 전달하기 위해서 객체로 포장을 하는 것입니다.
아래 예제의 결과들은 모양은 비슷하지만, 코드를 구현하는 방법이 다르고, 실제로 실행되는 방식이 미묘한 차이가 있습니다.
[예제 1] JSON 데이터를 그냥 출력해보기
소스코드
|
1
2
3
4
5
6
7
8
9
10
11
12
13
14
15
16
17
18
19
20
21
22
23
24
|
var p1 = {
"name" : {
"family_name" : "홍",
"given_name" : "길동",
"full_name" : "홍길동"
},
"tel" : {
"home" : "02-123-2345",
"office" : "02-459-7890",
"cell" : "010-123-3456"
},
"hobby": ["운동", "독서", "게임", "공부"]
};
document.write("성씨 : " + p1.name.family_name + "<br>");
document.write("이름 : " + p1.name.given_name + "<br>");
document.write("성명 : " + p1.name.full_name + "<br>");
document.write("집전 : " + p1.tel.home + "<br>");
document.write("사무 : " + p1.tel.office + "<br>");
document.write("개인 : " + p1.tel.cell + "<br>");
document.write("취미 : ");
for(var i=0; i<p1.hobby.length;i++){
document.write(p1.hobby[i] + " ");
}
|
cs |
결과

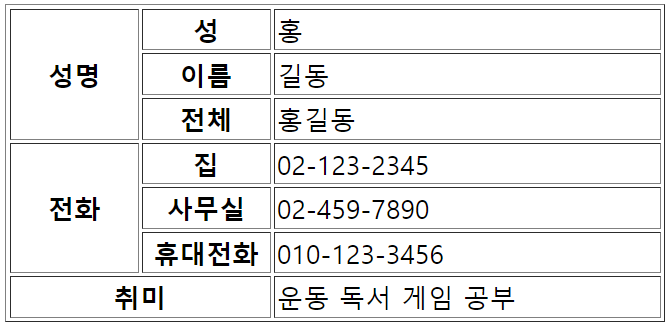
[예제 2] JSON 데이터를 테이블에 출력해보기 1
소스코드
|
1
2
3
4
5
6
7
8
9
10
11
12
13
14
15
16
17
18
19
20
21
22
23
24
25
26
27
28
29
30
31
32
33
34
35
36
37
38
39
40
41
42
43
44
45
46
47
48
49
50
51
52
53
54
55
56
57
58
59
60
61
62
63
64
65
66
67
68
69
70
71
72
73
74
75
76
|
var p1 = {
"name" : {
"family_name" : "홍",
"given_name" : "길동",
"full_name" : "홍길동"
},
"tel" : {
"home" : "02-123-2345",
"office" : "02-459-7890",
"cell" : "010-123-3456"
},
"hobby": ["운동", "독서", "게임", "공부"]
};
//익명함수
window.onload = function(){
//성씨넣기
document.getElementById("family").innerHTML = p1.name.family_name;
//이름넣기
document.getElementById("given").innerHTML = p1.name.given_name;
//풀네임 넣기
document.getElementById("full").innerHTML = p1.name.full_name;
//집 전화
document.getElementById("home").innerHTML = p1.tel.home;
//사무실 전화
document.getElementById("office").innerHTML = p1.tel.office;
//휴대전화
document.getElementById("cell").innerHTML = p1.tel.cell;
for(var i=0; i < p1.hobby.length; i++){
document.getElementById("hobby").innerHTML += p1.hobby[i] + " ";
}
}
<body>
<table border="1" width="400">
<tr>
<th rowspan="3" width="20%">성명</th>
<th width="20%">성</th>
<td><span id="family"></span></td>
</tr>
<tr>
<th>이름</th>
<td><span id="given"></span></td>
</tr>
<tr>
<th>전체</th>
<td><span id="full"></span></td>
</tr>
<tr>
<th rowspan="3" width="20%">전화</th>
<th width="20%">집</th>
<td><span id="home"></span></td>
</tr>
<tr>
<th>사무실</th>
<td><span id="office"></span></td>
</tr>
<tr>
<th>휴대전화</th>
<td><span id="cell"></span></td>
</tr>
<tr>
<th colspan="2" width="20%">취미</th>
<td><span id="hobby"></span></td>
</tr>
</table>
</body>
|
cs |
결과
테이블의 각 행의 id값을 통해 테이블에 데이터를 출력합니다.
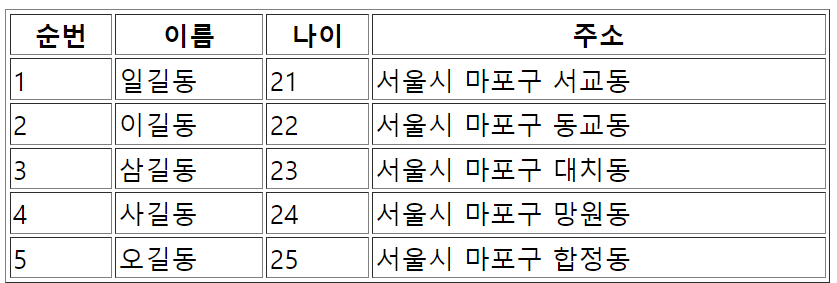
[예제 3] JSON 데이터를 테이블에 출력해보기 2
소스코드
|
1
2
3
4
5
6
7
8
9
10
11
12
13
14
15
16
17
18
19
20
21
22
23
24
25
26
27
28
29
30
|
<script type="text/javascript">
var p_array = [
{"name":"일길동", "age":21, "addr":"서울시 마포구 서교동"}, //0
{"name":"이길동", "age":22, "addr":"서울시 마포구 동교동"}, //1
{"name":"삼길동", "age":23, "addr":"서울시 마포구 대치동"}, //2
{"name":"사길동", "age":24, "addr":"서울시 마포구 망원동"}, //3
{"name":"오길동", "age":25, "addr":"서울시 마포구 합정동"}, //4
];
window.onload = function(){
var html = "<table border='1' width='500' >";
html += "<tr><th>순번</th><th>이름</th><th>나이</th><th>주소</th></tr>"
html += "<tr>";
for(var i=0; i<p_array.length;i++){
html += "<td>" + (i+1) + "</td>";
html += "<td>" + p_array[i].name + "</td>";
html += "<td>" + p_array[i].age + "</td>";
html += "<td>" + p_array[i].addr + "</td>";
html += "</tr>";
}
html += "</table>"
document.getElementById("display").innerHTML = html;
};
</script>
</head>
<body>
<div id=display></div>
</body>
|
cs |
결과
변수에 모든 태그를 직접 입력해서 출력합니다.
[예제 4] JSON 데이터를 동적으로 테이블에 출력해보기
소스코드
|
1
2
3
4
5
6
7
8
9
10
11
12
13
14
15
16
17
18
19
20
21
22
23
24
25
26
27
28
29
30
31
32
33
34
35
36
37
38
39
40
41
42
43
44
45
46
47
48
49
50
51
52
53
54
55
56
57
58
59
60
61
62
63
64
65
66
67
68
69
70
71
72
73
74
75
76
77
78
79
80
81
82
83
84
85
86
87
88
89
90
91
92
93
94
95
96
97
|
//방법 1. 반복문을 이용해서 전체 테이블을 한 번에 생성하기
<script type="text/javascript">
var p_array = [
{"name":"일길동", "age":21, "addr":"서울시 마포구 서교동"}, //0
{"name":"이길동", "age":22, "addr":"서울시 마포구 동교동"}, //1
{"name":"삼길동", "age":23, "addr":"서울시 마포구 대치동"}, //2
{"name":"사길동", "age":24, "addr":"서울시 마포구 망원동"}, //3
{"name":"오길동", "age":25, "addr":"서울시 마포구 합정동"}, //4
];
window.onload = function(){
//테이블 참조값 구하기
var table1 = document.getElementById("table1");
for(var i=0; i<p_array.length; i++){
//행추가
var row = table1.insertRow();
//열 추가
var cell1 = row.insertCell(0);
var cell2 = row.insertCell(1);
var cell3 = row.insertCell(2);
var cell4 = row.insertCell(3);
//데이터 넣기
cell1.innerText = i+1;
cell2.innerText = p_array[i].name;
cell3.innerText = p_array[i].age;
cell4.innerText = p_array[i].addr;
}
};
</script>
</head>
<body>
//위에서는 행만 추가하기때문에 기본 테이블의 틀은 만든다.
<table id="table1" border="1" width="500">
<tr>
<th>순번</th>
<th>이름</th>
<th>나이</th>
<th>주소</th>
</tr>
</table>
</body>
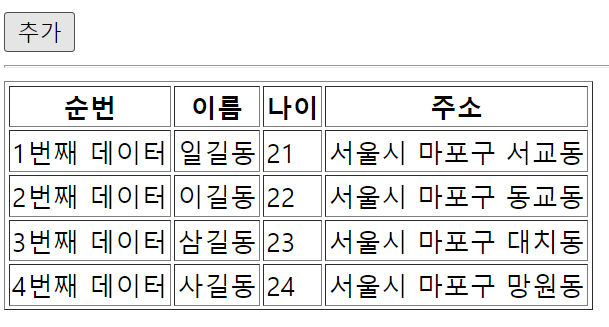
//방법 2. 버튼을 이용해서 실시간으로 한 행씩 추가하기
<script type="text/javascript">
var p_array = [
{"name":"일길동", "age":21, "addr":"서울시 마포구 서교동"}, //0
{"name":"이길동", "age":22, "addr":"서울시 마포구 동교동"}, //1
{"name":"삼길동", "age":23, "addr":"서울시 마포구 대치동"}, //2
{"name":"사길동", "age":24, "addr":"서울시 마포구 망원동"}, //3
{"name":"오길동", "age":25, "addr":"서울시 마포구 합정동"}, //4
{"name":"육길동", "age":26, "addr":"서울시 마포구 수서동"}, //5
];
count = 0;
function add_row(){
//테이블의 element정보 가져오기
var table = document.getElementById("table1");
//새로운 행 삽입하기
var newRow = table.insertRow();
//위에서 삽입한 행에 열에 해당하는 셀을 만들기
const newCell1 = newRow.insertCell(0);
const newCell2 = newRow.insertCell(1);
const newCell3 = newRow.insertCell(2);
const newCell4 = newRow.insertCell(3);
//데이터 넣기
newCell1.innerText = (count+1) + "번째 데이터";
newCell2.innerText = p_array[count].name;
newCell3.innerText = p_array[count].age;
newCell4.innerText = p_array[count].addr;
count++;
}
</script>
</head>
<body>
<hr>
<input type="button" value="추가" onclick="add_row();">
<hr>
<table id="table1" border="1">
<tr>
<th>순번</th>
<th>이름</th>
<th>나이</th>
<th>주소</th>
</tr>
</table>
</body>
|
cs |
결과
방법 1 [반복문을 이용해서 테이블 한 번에 생성]
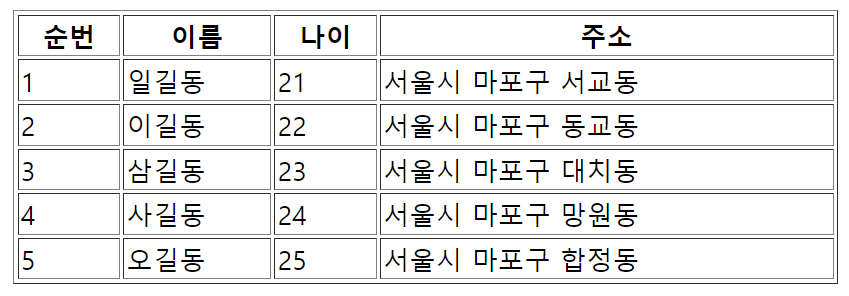
방법 2 [버튼을 눌러서 한 행씩 추가]
'BackEnd > WEB' 카테고리의 다른 글
| UML_국비_DAY52 (0) | 2022.05.13 |
|---|---|
| JSP_국비_DAY48 (0) | 2022.05.09 |
| JDBC 미니프로젝트 2일차 (0) | 2022.05.05 |
| JSP_국비_DAY46 (0) | 2022.05.04 |
| 국비_DAY45 (0) | 2022.05.03 |